If you have a gas stove, you know how important it is to have a functioning pilot light. The little flame ignites your burners, and without it, you won’t be able to cook your meals. But what do you do when your pilot light goes out? Don’t worry; you don’t need to call a professional yet. With some know-how, you can fix your pilot light like a pro!
In this guide, we’ll walk you through the steps you need on how to fix a pilot light on a gas stove. Whether you’re a seasoned DIYer or a complete novice, we’ll break down the process into easy-to-follow steps that anyone can understand. You’ll learn what tools you need, how to shut off the gas supply safely, and how to relight the pilot light.
So, if you’re ready to take on the challenge of fixing your gas stove’s pilot light, grab your tools and let’s get started!
What is the pilot light on a gas stove?
A pilot light on a gas stove is a small flame that burns continuously to provide a source of ignition for the burners. It is typically located at the base of the stove, near the burners, and is fueled by a small amount of gas constantly flowing into it.
When you turn on a burner on a gas stove, the gas flows through the burner and is ignited by the pilot light, which heats up a small thermocouple. The thermocouple generates a small electrical current sent to the gas valve, telling it to keep the gas flowing to the burner.
The pilot light would burn continuously in older gas stoves, even when the stove was not in use. This meant gas constantly flowed into the stove, which could be a safety hazard if the pilot light went out. However, newer gas stoves often use electronic ignition systems that only ignite the gas when a burner is turned on, eliminating the need for a pilot light.
Importance Of Fixing A Pilot Light
Fixing a pilot light on a gas stove is essential for several reasons:
1. Safety
A pilot light that is not functioning correctly can be a safety hazard. If the flame is too small or goes out entirely, gas can continue to flow into the stove, creating a risk of gas buildup and even an explosion or fire. Fixing the pilot light ensures it works correctly and reduces the risk of accidents.
2. Energy Efficiency
A pilot light that is not functioning properly can waste gas and increase your energy bills. This is because the gas continues to flow even when the stove is not in use, leading to unnecessary gas consumption. Fixing the pilot light ensures it is burning efficiently and can save you money on energy bills.
3. Convenience
A properly functioning pilot light makes it easy to light the burners on your gas stove. With a working pilot light, you may use matches or a lighter to light the stove, which can be inconvenient and time-consuming.
Why Won’t My Gas Stove Light?
Common Issues With Pilot Lights:
There are several reasons why a gas stove may not light. Some of the most common issues include:
- Pilot light is out: The pilot light is responsible for igniting the gas burner. If it goes out, the burner won’t light.
- Clogged burner holes: Over time, the small holes on the burner can become clogged with food debris and grease, which prevents the gas from flowing correctly.
- The gas valve is closed: If the gas valve is closed, the gas won’t flow to the burner.
- Faulty ignition system: If the stove has an electronic ignition system, it may need to be fixed.
- Gas pressure is low: If the gas pressure is low, the stove may not light properly.
- Dirty thermocouple: The thermocouple is a safety feature that shuts off the gas if the pilot light goes out. If the thermocouple is dirty, it may not function correctly, preventing the burner from lighting.
- Broken gas line: A broken gas line can prevent the gas from reaching the burner.
Where Is The Pilot Light?
Generally, the pilot light is located near the burner assembly of a gas furnace.
In older furnaces, the pilot light may be visible through a small window in the front panel of the furnace. In newer furnaces, the pilot light may be located behind a panel that must be removed for access.
How To Fix A Pilot Light On A Gas Stove?

1. Safety First
Before attempting to fix a pilot light, it is essential to take the necessary precautions to ensure your safety. Gas appliances can be dangerous if not handled properly. Here are some precautions to take before attempting to fix a pilot light:
- Turn off the gas supply: The supply must be turned off before fixing the pilot light. Locate the gas valve near the gas meter, and turn the valve to the off position.
- Wait for gas to dissipate: Wait for a few minutes to allow any gas that may be present to dissipate before working on the pilot light.
- Wear protective gear: Wear protective gear such as gloves and eye protection to prevent injury while working on the pilot light.
- Use the correct tools: Ensure you have the necessary tools before beginning the repair.
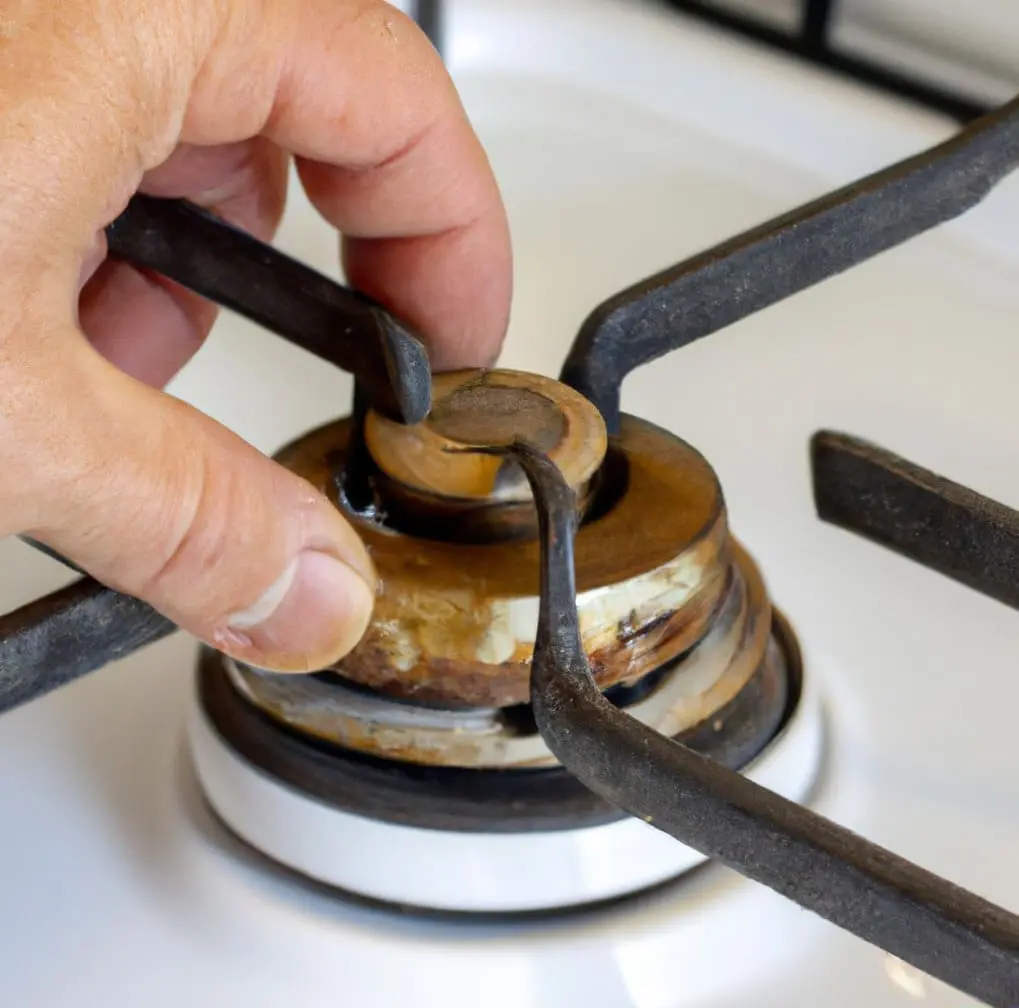
2. Inspect the Pilot Light
After taking the necessary safety precautions, the first step is to inspect the pilot light. Here’s what to do:
- Check for debris or blockages: Debris or blockages in the pilot light can prevent it from functioning correctly. Use a small brush or compressed air to remove any debris that may be present.
- Clean the pilot light and surrounding area: Use a soft cloth to clean the pilot light and the surrounding area. This will ensure the pilot light is free from any dirt or grime that may prevent it from functioning correctly.
- Check for a damaged thermocouple or igniter: A damaged thermocouple or igniter can prevent the pilot light from staying lit. Check for any damage, and replace the thermocouple or igniter if necessary.
3. Adjust the Pilot Light Flame
Once you have inspected the pilot light, the next step is to adjust the pilot light flame. Here’s how:
- Locate the pilot light adjustment screw: The screw is typically near the pilot light. Refer to your appliance’s owner’s manual to locate it.
- Adjust the flame using a screwdriver: Use a screwdriver to adjust the flame. Turn the screw clockwise to decrease the flame or counterclockwise to increase the flame.
- Test the flame to ensure it is the correct size: After adjusting it, test it to make sure it is correct. The flame should be blue and steady. If it is not, adjust it further.
4. Relight the Pilot Light
After adjusting the pilot light flame, the next step is to relight the pilot light. Here’s what to do:
- Instructions for relighting the pilot light: Refer to your appliance’s owner’s manual for specific instructions on how to relight the pilot light. You must turn the gas supply back on and hold down the pilot light button while igniting the flame.
- Troubleshooting tips if the pilot light does not stay lit: If the pilot light does not stay lit, there may be an issue with the thermocouple or igniter. Refer to your appliance’s owner’s manual for troubleshooting tips.
- Checking for gas leaks before turning on the gas supply:
- Before turning on the gas supply, check for any gas leaks using a gas detector.
- If you detect a gas leak, do not attempt to turn on the gas supply.
- Contact a professional for assistance.
5. Maintenance Tips
Finally, it is essential to perform regular maintenance to prevent pilot light issues. Here are some maintenance tips:
- Schedule regular maintenance: Schedule regular maintenance with a professional to ensure your gas appliances function correctly.
- Signs that it is time to call a professional: If you notice any of the following signs, it may be time to call a professional for assistance: a yellow pilot light flame, a flickering pilot light flame, a pilot light that will not stay lit, or a strong gas smell coming from your appliance.
- Keep the pilot light and surrounding area clean: Regularly clean the pilot light and the surrounding area to prevent debris or dirt from obstructing the pilot light.
- Replace the thermocouple or igniter if necessary: If you notice that the pilot light is still not functioning correctly after cleaning and adjusting the flame, the thermocouple or igniter may need to be replaced.
How To Fix Pilot Light On Gas Oven?
Fixing a pilot light on a gas oven is a relatively simple process that can be done in a few steps. First, locate the pilot light, usually at the bottom of the oven. Please turn off the gas supply to the oven and allow it to cool down completely. Use a flashlight to inspect the pilot light and the surrounding area for any signs of dirt or debris blocking the gas flow.
If there is dirt or debris, carefully clean it using a soft brush or a vacuum cleaner with a crevice tool. If the pilot light is still not igniting, it may be necessary to relight it manually. Follow the manufacturer’s instructions for relighting the pilot light, which usually involves holding down a button or knob while igniting the pilot light with a match or lighter.
Once the pilot light is lit, hold the button or knob for a few seconds to allow the thermocouple (a safety device that prevents gas from flowing if the pilot light is out) to heat up. Release the button or knob and turn the oven on to test whether the pilot light remains lit. Suppose the pilot light continues to go out. In that case, replacing the thermocouple or calling a professional for assistance may be necessary.
How To Fix A Gas Stove Burner That Won’t Light?
If you’re having trouble lighting a gas stove burner, there are a few steps you can take to troubleshoot and fix the issue:
- Clean the Burner: Make sure the burner is clean and free of debris. Remove the burner grate and use a soft-bristled brush or a toothbrush to clean the burner head and the tiny holes where the gas comes out. You can also use a pin or needle to clear any clogs in the holes.
- Check the Gas Supply: Ensure the gas supply valve is open and the gas line is not clogged or obstructed. If the gas supply valve is turned off, turn it back on and try lighting the burner again.
- Check the Igniter: If the burner has an electronic igniter, check to make sure it’s clean and dry. You can also use a match or lighter to light the burner manually. If the igniter is dirty or not working correctly, it may need to be replaced.
- Adjust the Burner Cap: Check to ensure the burner cap is properly aligned and seated on the base. If it’s not aligned, adjust it until it’s centered on the base.
- Check the Spark Module: If your gas stove has a spark module, it may need to be replaced if the burner won’t light. You can test the spark module with a multimeter to determine if it works properly.
Is It Dangerous If The Pilot Light Goes Out On the Stove?
If the pilot light on your stove goes out, taking the proper steps to relight, it is generally safe. However, it is essential to understand why the pilot light went out in the first place.
A pilot light can go out for various reasons, including a gust of wind, a drafty kitchen, or a malfunctioning part. If the pilot light goes out repeatedly, it could indicate a problem with the stove that needs to be addressed.
When the pilot light goes out, it’s important to turn off the gas valve and allow any remaining gas to dissipate before attempting to relight the pilot. You should also avoid using electrical switches, as a spark could ignite the gas. Once the gas has dissipated, you can relight the pilot light by following the manufacturer’s instructions.
What Happens If Pilot Light Goes Out On Stove?
If the pilot light goes out on your stove, the burners and oven will not light up, as the pilot light is responsible for igniting the gas. Without the pilot light, there will be no ignition source for the gas, and the stove will not function.
You can see that the pilot light has gone out in some cases. You may only realize it in others once you try to turn on the stove, and nothing happens. It’s important to note that if you smell gas when you try to light the stove or oven, you should immediately turn off the gas valve and contact a professional, as there may be a gas leak.
If the pilot light has gone out, you can relight it by following the manufacturer’s instructions. However, suppose the pilot light continues to go out, or you smell gas. In that case, you should contact a professional to inspect the stove and ensure it functions correctly.
Bottom Lines
Hopefully, this article helped guide you to fix your pilot lights. Learning how to operate electrical and gas stoves will keep you safe and help you not to call someone out whenever it’s inconvenient. By investing less in repairs and bills and more in an appliance repair book, you’ll be able to save money and time and get a better deal on these repairs!
")


